Water treatment pumps are the unsung heroes of clean water systems, responsible for moving water through filtration barriers, injecting chemicals for disinfection, and maintaining necessary pressure. Whether you are managing a small residential well system or a larger industrial plant, understanding how to select, install, and maintain these pumps is critical.
Part 1: Understanding the Types of Pumps
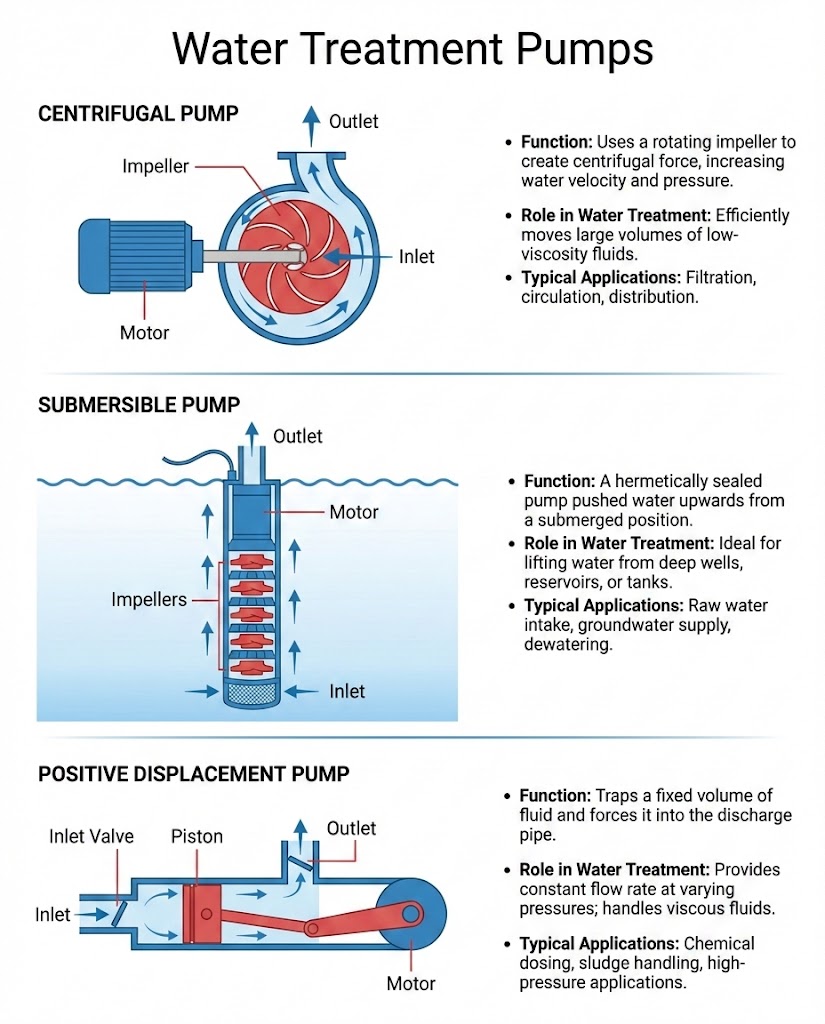
1. Identify Centrifugal Pumps for high-volume transfer.
Centrifugal pumps are the most common type used in water treatment. They use a rotating impeller to create a vacuum that pulls water in and pushes it out.
- Best for: Moving large volumes of water with low viscosity (like raw water intake or backwashing filters).
- Key Feature: They provide a smooth, non-pulsating flow but can lose efficiency if the viscosity increases.
2. Use Positive Displacement (Dosing) Pumps for chemical injection.
Unlike centrifugal pumps, these move a fixed amount of fluid with each cycle. In water treatment, these are often diaphragm or peristaltic pumps used to inject precise amounts of chemicals like chlorine, coagulants, or pH adjusters.
- Best for: High-pressure injection and precise metering of chemicals.
- Key Feature: Flow rate remains constant regardless of pressure changes in the system.
[Image of chemical dosing pump diagram]
3. Select Submersible Pumps for deep water extraction.
These pumps are hermetically sealed and designed to be fully submerged in the water source, such as a well or a retention basin.
- Best for: Lifting water from deep underground aquifers or emptying tanks.
- Key Feature: They are self-priming (because they are already underwater) and generally quieter than surface pumps.
Part 2: Selecting the Right Pump
1. Calculate the Total Dynamic Head (TDH).
You cannot buy a pump based on horsepower alone. You must know the “head,” which is the vertical height the pump must lift the water, plus the friction loss caused by pipes and valves.
- Add the Static Head (vertical distance from water surface to discharge point) to the Friction Head (resistance in the pipe).
- If your pump cannot overcome the TDH, flow will drop to zero.
2. Read the Pump Curve.
Every pump comes with a “performance curve” chart provided by the manufacturer. This graph plots the Flow Rate (GPM) against the Head (Feet/Meters).
- Locate your required flow rate on the bottom axis.
- Locate your calculated TDH on the side axis.
- Find where these two lines intersect. Ideally, this point should fall in the middle third of the pump’s curve, known as the Best Efficiency Point (BEP).
[Image of centrifugal pump performance curve chart]
3. Check Chemical Compatibility.
If the pump is moving anything other than pure water (e.g., brine, chlorine, or acid), the “wetted parts” (seals, O-rings, impellers) must be resistant to corrosion.
- Chlorine: Use Viton or PTFE seals.
- Acids: Avoid standard cast iron; opt for PVDF (Kynar) or Hastelloy.
Part 3: Installation Best Practices
1. Install isolation valves on both sides.
Always place a shut-off valve on both the suction (inlet) and discharge (outlet) sides of the pump. This allows you to isolate the pump for maintenance without draining the entire system.
2. Ensure the suction pipe is straight.
Turbulence at the pump inlet causes cavitation (formation of air bubbles that collapse and damage the impeller).
3. Prime the pump before starting.
Centrifugal pumps cannot pump air. If the pump casing is full of air, the impeller will spin uselessly and eventually overheat and fail.
- Fill the pump casing and suction line with water before turning it on.
- Note: Submersible pumps do not need priming.
Part 4: Maintenance and Troubleshooting
1. Monitor for Cavitation.
Cavitation sounds like gravel or marbles rattling inside the pump housing. This is caused by low pressure creating vapor bubbles that implode violently against the metal.
- Fix: Check for clogged suction strainers, partially closed suction valves, or a suction lift that is too high.
2. Inspect Mechanical Seals.
The mechanical seal prevents water from leaking along the rotating shaft. If you see water dripping from the shaft area, the seal has failed.
[Image of pump mechanical seal diagram]
3. Check Oil Levels (for some pumps).
Some larger pumps and submersible motors have oil-filled chambers for cooling. Check the oil annually. If the oil looks milky, water has breached the seal, and the pump requires immediate service.